An eCommerce website allows you to engage your customers and trade with them without needing to go to the expense of an actual physical store front. Customers are able to view, inquire about, and purchase your wares directly. You're able to keep your costs low as your supply options are less restricted because you don't need to keep a shop fully stocked. You're able to be far more flexible in how you sell your products, as adapting your store to any changes in your business is rapid and effective.
This flexibility is available even if you don't want to have customers purchasing directly from your site. There is no requirement for an eCommerce website to contain a purchase process.
What we are able to do for you is to use the power of our eCommerce system to present your catalogue of products in the most effective manner possible, driving sales to your business whilst keeping the implementation simple and flexible enough to adapt to change and the growth of your business. Need to display your products by category? We can do that. Need sub-categories? We can do that too! Need your products to appear across different categories and inside sub-categories of a sub-category? We can do that!
Here is a step by step guide to download (with screen shots) to help you. Alternatively, you can just read the information below (without screen shots)
Firstly you must determine the type of product you are selling - will you ship it, can the customer download it , are they buying a voucher to complete the purchase later, and does your item have multiples of the one thing ie different sizes or colours. You can have a mixture of these within your website, but you must choose the correct method when setting it up, as you cannot edit the type of product - you have to start again.
- From the administration menu choose 'Create Content'
- Scroll down to 'Product'
- From the list of products choose the correct one for your purpose - Product Types are:
- Product Variations allow a product to have multiple available versions with some variation and optionally unique prices per variation. ie Size, Colour, finish - (see further detail on setting up a Variation Product in our eCommerce Drupal Module)
- A shippable product is a tangible, physical item. Optional features includes inventory control and availability estimates but no variation in sizes and colours
- A Gift Certificate Creates Certificates for customers to use for later purchases.
- A Non Shippable product is more flexible and can represent a good or a service. ie downloadable product, or 'book and pay' for a service.
- If you want your item to appear in more than one category ie in tops as well as specials, hold down the Ctrl Key on your keyboard while you select each category with your mouse.
- To upload an image, click on browse and choose from your computer, find the image and either double click or click and 'open'. Then click on Upload.
its best to have all your product images ready in one section on your computer and resized to what you require for your website. Read more on resizing an image - Complete all the required fields including 'Sell Price'. This price should include the gst, however it's dependent on the site itself and how it's themed based on what you've ask in your set up.
- Leave the 'Add to cart' link as the default unless you are setting up a Variation Product, then you should choose 'Hidden'.
- If you want to manage how many items you have with inventory control - then tick the 'Manage Stock' box.
- The Product Weight and Size fields are mainly for your reference and are not required for you to complete. If you are using a complex shipping method that requires weight and size, there will be other fields you will have to complete with that module. You will be given separate instructions for these fields.
- If you are not sure about the fields and whether you require them, such as 'renewable schedule' and 'priority' - leave them as the default. We will give you instructions if you need to choose these.
- Scroll down and save your product
Product Variations are used when you have one item that comes in different variations, but you could use the one image in your product catalogue ie, a t-shirt might come in white, blue and red, but each colour will also come in small, medium, and large - so this product will have 2 variations for the one item - 1: Colour, 2: Size.
If you would like further instructions on setting up variations for your website view our instructions here
You would create a Variation Product when your item has different colours, sizes or various different attributes for the one item, ie a top that comes in small, medium and large, as well as red, blue and white. Each variation product must have at least one attribute for the customer to choose from. If you don't believe you have any attributes for this product, then, choose a shippable or non-shippable product type.
First you need to set up your Variations and Attributes so that you can choose from these lists when you set up the product.
- Go to your administration menu and choose from eCommerce Configuration - Product Variations - Attributes (note do not change anything in Settings, or Variations Products List).
- There may already be some items in the list of Attributes - Scroll to the bottom and type in the blank field, an Attribute name that will make sense. ie Size.
- Choose Primary
- Don't worry about changing the Filter box unless you get special instructions from the Aspedia Support team
- You Must Reorder your Primary Attributes above your Secondary Attributes, do this by dragging the cross to the left of the Attribute to it's correct location
- Click Add Value
- Save Your Page after you've re-ordered.
Note, The order that you put your attributes in this list - will be the order that your customer will choose when they are purchasing your product.
Do Not Add another Attribute at put it above Primary Attributes that are already in the list once you have already created some products. Only add further Primary Attributes below the existing ones. This could affect the existing products that you have already created.
Now you need to add the Values that belong to this Attribute - click on Values in the same line as the Attribute you want to add values
- Enter the first Value in the blank field ie Small, or medium, or 1 Litre, or 500ml
- If you are going to ask for more dollars for this value, enter the increase in 'Price Adjustment' ie Gold might cost 20% more than Silver or XXL might cost $1 more than small. Just add the increase on the base price which you will include when you set up the product. If you aren't charging more - leave this field blank
- If you want to restrict some customers from seeing some of the attributes, then you can choose who will see it here - if you want to sell to everyone - leave it blank.
- Click on Add Value
- Keep repeating this until you have entered all the values you expect you will use over all your products. ie Small, Medium, Large, XL, 8, 10, 12, 14, 16
- Then Click on Save
Note, The order that you put your values in this list - will be the order that your customer will see in the drop down when they are purchasing your product. You can come back and add more Values later.
Now you will create your product
- From the administration menu choose 'Create Content'
- Scroll down to 'Product'
- From the list of products choose Product Variations
- If you want your item to appear in more than one category ie in tops as well as specials, hold down the Ctrl Key on your keyboard while you select each category with your mouse. (The categories should already be set up by Aspedia as per your instructions when designing your website).
- To upload an image, click on browse and choose from your computer, find the image and either double click or click and 'open'. Then click on Upload.
its best to have all your product images ready in one section on your computer and resized to what you require for your website. Read more on resizing an image - Complete all the required fields including 'Sell Price'. This price should include the gst.
- You Must remember to tick Hidden in the 'Add to cart' link - as the cart will create one for the attributes (you only need to do this for Variation Products)
- If you want to manage how many items you have with inventory control - then tick the 'Manage Stock' box.
- The Product Weight and Size fields are mainly for your reference and are not required for you to complete. If you are using a complex shipping method that requires weight and size, there will be other fields you will have to complete with that module. You will be given separate instructions for these fields.
- If you are not sure about the fields and whether you require them, such as 'renewable schedule' and 'priority' - leave them as the default. We will give you instructions if you need to choose these.
- Scroll down and save your product
 After you save your product you will need to add in the variations - you will see an error signal until you add your first attribute and the values to the product (this is normal).
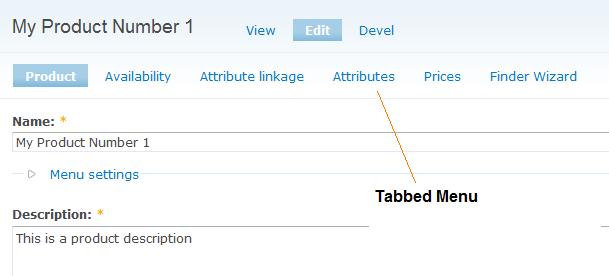
- The first time you are setting up a product the system will automatically take you to the correct page to add your attributes. If you need to go back and edit your attributes, you will have to choose from the product menu 'Attributes' which is tabbed along the top of screen.
- Tick each box of the attributes that you require for this product.
- Scroll down and click the save button.
- Now click on 'Availability' from the tabbed menu
- This is where you will set up which values from each attribute are required for each product. First check what stock you do want to set up
- From your first attribute choose either all or one of the fields
- If you have a second attribute choose either all or one of the fields etc
- Don't worry about 'Filter Selected' unless you have been given specific instructions from the Aspedia Support Team
- Click 'Add Selected'
- Repeat this until all your values have been chosen all the items that you want to sell for this product.
- If you have combinations of attributes that are not available, you can remove them from the list of available configurations before your save your page so customers cannot attempt to purchase them.
- If one or some of your products are going to cost more or less than your default price - this is another area where you can set what they would cost - this is an override price, not a percentage or dollar increase/decrease
- When you have all your items right - Scroll down and click save
- If you would like to view your product - click on 'View' in the menu above the tabbed menu. You can continue to Edit your product if required by clicking on the edit button.
If you understand what an Attribute is for a Product Variation you may require to set up secondary attributes. However, you would only set them up if you required a customer to choose a product, then choose a attribute, before they would even see the options of a secondary attribute.
- For example, you might sell Cars, Your product would belong to a category - which might be Car Make A, B or C
- Within the Car Make, you might have a products that include, Small Car, Family Car, Ute, and 4 Wheel Drive.
- Say for example if you chose the Small Car the first attribute/s may be Sedan or Hatch, as well as Automatic or Manual
- Until you've chosen which of these you are looking for, the system can't tell what all the features are available, which might for the Sedan, 2 or 4 door, but for the hatch 3 or 5 door. These secondary attributes belong to specific primary attributes.
Most websites aren't this complex, but our Drupal eCommerce system can handle it if you do have a complex sales process.
A second example may be
- You sell furniture
- Your categories are set up, bedroom, lounge, kitchen, dining
- Your products within lounge room are lounges, chairs, coffee tables etc
- Within your lounge product - the primary attributes may be 2 or 3 seater, Small or Large cushions
- While the secondary attribute could be all the different fabrications that the lounges are available in. This is a slightly different example, because the fabrics are available to both the 2 or 3 seater, but to place the order, you need the customer to choose the attributes separately.
If you are unclear if you need to set up primary or secondary attributes, please contact our support team.
Shipping can be quite a complex solution, and your website will be set up according to what you discussed with your salesperson when you gave instructions on your requirements.
The types of shipping modules we can include in your Drupal website are:
- A dollar value per item added to the cart once all items are chosen
- A dollar value per order added to the cart once all items are chosen
- You will have to include weight and dimensions of each item plus the customer must choose delivery address before they are shown the shipping cost. (This probably isn't appropriate if you have large items to ship).
Unfortunately, you can't choose some products with one shipping method and other products with another shipping method - the shipping method has to be site wide.
For some customers, you can make money on your shipping, while others may choose to loose a little on their shipping to get the sale. We recommend when you discuss shipping on your website, you call it 'postage and handling' or similar, so that the customer understands it includes more than just the postage or courier value. This way you can charge a little more so that you won't be out of pocket.
We also have certain systems available that allow you to get an individual quote, for example, E-Go Freight allows you to get a quote for shipping during the checkout process provided all the required information has been completed for your products and the customer has entered valid postcodes.
If you have a specific freighting system you wish to use and you would like to integrate it into your site this is certainly possible. However, we require that they provide an API to us to utilise and communicate with and here will be a development cost associated with this if the API meets the requirements.
Enabling the shipping-api adds the option to the transaction list screen to send the shipping notification email, if there is no shipping module installed then the option does not appear.
To select the shipping model that is best for you, it's important to consider how much of an impact it has on the purchase process for delivery to a customer.
This depends entirely on the type of details you are wanting to change, we recommend you contact us to ensure the best possible presentation and accuracy of your Tax Invoice is maintained. Some things are quite simple to change and our support team would be able to help you via email or phone should you just wish to change any of the additional charges or discounts your site may offer.
However if you wish to change the layout or heavily customise the design of the Tax Invoice you will need to arrange a time to meet with us to discuss these changes.
When the customer receives the invoice is dependent on how your eCommerce system is structured within your site. For example, a straight forward eCommerce site with simple products and a Cash On Delivery payment method, will send the customer their invoice as soon as their order is placed. However for a more advanced site that utilises a different payment system, such as PayPal or SecurePay will have their invoices sent to the customer once their payment has been cleared and completed.
No, you first need to choose transaction complete and then you can inform them via email.
The customer receives the Tax Invoice as per the site setup, but there is no additional notification sent to the customer to indicate that you have received the order. As part of the eCommerce setup is to automatically notify you in the event of an order being placed, and the customer is sent the Tax Invoice at this time there is no need to send an additional notification to the customer.
Don't forget as well that we don't want to spam the customer with communications, too many emails from a website has the very real chance of annoying your customers and disuading them from buying from your store again.
There are two statuses for every transaction :
Workflow & Payment. Both of these will trigger certain actions on the site when they are selected and saved. Cash On Delivery is an exception to this as it requires you to manually set the payment status of the transaction to completed, in addition to updating the workflow status of the transaction.
Aside from updating Transaction workflow statuses to 'Complete', there will be little need to monitor and manually adjust the workflow of specific transactions as the system handles it itself.
When you have an order that you needs to be processed:
- Login to your website
- Go to the administration menu and choose eCommerce - scroll down to transactions
- The first column TXNID - is the number of the transaction
- The second User - is the name / email of the person who purchased
- Payment Status shows who has paid and who hasn't - if the payment is pending - the client hasn't paid yet, they processed the order but once they left your site to continue the purchase with the bank or pay pal etc - the payment hasn't gone through yet. If the payment status says completed - the money has been received and you will have a received an email from the website to let you know an order has arrived.
- Workflow is where the order is up to along the processing path - depending on the setting in this workflow will depend on how often or not the website sends you an email reminding you of this order. The settings are:
- Received - sends an email every 6 hours.
- Invoiced - allows you to print the invoice to send with the product and sends an email every 12 hours - it will display the invoice on screen and you can choose where to print it
- Shipping Notify - is a pre-sent email message that allows you to send this to the client from within the website - you will have to modify the email if you want something else written and click the submit button to send the notification to client. If the client hasn't given you an email address, you might be able to get one from the notification sent by your payment provider.
- Ask Customer - is an email template that lets you email the customer from the website - note that whichever address is set up as the system default will be where they respond. If you save the transaction with this status - if means that if anyone else looks at the transactions they will know you have asked the customer a question pertaining to the order and are waiting to hear back.
- Cancellation - is a pre-sent email message that allows you to send this to the client from within the website - you will have to modify the email if you want something else written and click the submit button to send the notification to client.
- Resend invoice - sends a copy via email to the client that has purchased. You won't even have to click submit for this to work - you only have to choose 'resend invoice'.
- Completed - means the website won't send any reminder emails to you - and all your staff understand the order is finished.
- To change the status that is showing - click on edit on the far right of the line
- From the Transaction workflow drop down - choose the status that you want to appear (if you clicked on the 'change workflow' checkbox within each of these transactions, the website will update them automatically and you won't have to edit the transaction yourself).
Also on this page you can view the value of the order, when it was ordered, when the status was changed last, the items that have been purchased, as well as take you straight to the product for you to update anything. (Be careful changing quantities here if you have product variations - you might be better going to the product through the menu and changing quantities on each size / colour of the item).
You will receive an email at the address that was supplied by you - if you want this updated at any time, please notify our support staff and they can change it for you.
The email will let you know there is an order on the website with a total amount and who has purchased it. You will only receive the email if the payment status is completed - this means that you have received the money from your payment provider. Read more on Payment Status for eCommerce Orders here.